You’ve seen them in Python and you’ve seen it in TensorFlow, the functional APIs for Keras are becoming increasingly common for multilateral analysis and dashboard building. Before jumping straight into the specifics of the codes and structure, a little bit of preliminary introduction to setting up the environment and its packages may be of great use, whether you’re a novice or an expert programmer.
GETTING STARTED
First and foremost, have the latest version of Python with the packages- SciPy, NumPy, Matplotlib and Theano installed. You can choose to run these using the jupyter notebooks through anaconda or by using the terminal window but Anaconda is preferred.
Keras Functional API
Then install the Keras functionality to the program using the pip install function. You can confirm you have it installed by typing $ pip in your command line. This will produce a list of commands and options that come along with the package. It should output a list of commands and options
$ pip install keras $ python -c "import keras; print keras.__version__" $ pip install --upgrade keras
Import the necessary libraries modules for keras including the sequential and python plots.
from keras.models import Sequential, Keras core layersPython from keras.optimizers import Adam from keras.layers import Dense, Dropout, Activation, Flatten, Input, LSTM
Keras CNN layersPython, from keras.layers import Convolution2D, MaxPooling2D
The next step involves adding some utility functions to the Python environment by using the import function. Among the most important include the ones for numpy utility, neural network architectures and hidden layers.
from keras.utils import np_utils, from keras.datasets import mnist
Running a sample program
Split the data into the required sets for training and testing, using the following code. Alternatively, you can choose to split the data using the train_test_Split function or the cv syntax (cross validation)- (X_train, y_train), (X_test, y_test) = testdata.load_data()
Perform some necessary exploratory analysis of the data by using the matplotlib commands to compose graphs, distribution plots and correlation graphs for the inputs:-
from matplotlib import pyplot as plt, plt.imshow(X_train[0])
Users have to specify the dimensional depth of the input range by using the Theano backend. Theano is strikingly useful for its potential to process large sums of visual media taking up gigabytes of space. It’s also necessary to run and transform the dataset from one shape to another having a particular width, depth and height.
X_train = X_train.reshape(X_train.shape[0], 1, 28, 28).
X_test = X_test.reshape(X_test.shape[0], 1, 28, 28)
Convert the data to a float type and normalize the values between the range [0, 1]. Then convert the dimensionality of the entire data to another format using the code below:-
X_train = X_train.astype('float32'), X_test /= 255
Y_test = np_utils.to_categorical(y_test, 10)
Defining the model architecture
Defining the model architecture is important to let the system know what kind of a neural network schema is to be created or the number of hidden layers to be added. Add the input layer information and activate the function:-
model = Sequential()
model.add(Convolution2D(32, 3, 3, activation='relu', input_shape=(1,28,28)))
print model.output_shape model.add(Convolution2D(32, 3, 3, activation='relu'))
model.add(MaxPooling2D(pool_size=(2,2))) model.add(Dropout(0.25))
model.add(Flatten()) model.add(Dense(128, activation='relu'))
model.add(Dropout(0.5)) model.add(Dense(10, activation='softmax'))
The density of the layers plays an important part in making the models more defined and helps them in reaching the outputs faster, given the size of the layers is properly designated. Luckily for users, Keras automatically handles the connections between layers without needing to code for each segment.
Functional API with layers
model = Sequential(),
model.add(Convolution2D(32, 3, 3, activation='relu', input_shape=(1,28,28))), model.add(Convolution2D(32, 3, 3, activation='relu'))
model.add(MaxPooling2D(pool_size=(2,2))). model.add(Dropout(0.25))
model.add(Flatten()), model.add(Dense(128, activation='relu'))
model.add(Dropout(0.5)), model.add(Dense(10, activation='softmax'))
The above code preps the environment to include the loss function which tells the API when to stop and also ‘flattens’ the coefficients of the inputs. This is done to convert it to a 1-dimensional format before being sent for processing in the dense layers. And with just a few finishing touches, the entire program is ready to be compiled and optimized.
model.compile(loss='categorical_crossentropy',optimizer='adam',metrics=['accuracy'])
Keras has a variety of loss functions and out-of-the-box optimizers to choose from that should be selected based on the objective behind the entire program. This can include a tuning algorithm for a random forest model or finding the feature importance list from a neural network schema.
model.fit(X_train, Y_train, batch_size=32, nb_epoch=10, verbose=1)
Once the model has been fit and tested, it has to be imposed against a set of early stopping rules using callbacks. One should save the model weights using the history log or keep it in a separate matrix or dataframe. Finally get the model scores printed and check for accuracies.
score = model.evaluate(X_test, Y_test, verbose=0)
System prepping and specifics
If you’re planning on having the data inserted into the system using standard JSON files, it’s usually suggested to have the mainframe confirm its packages in the system. Multi-level GPU mining is possible with Keras with some tweak-ups.
The hardware components used for system prepping and improving neural networks are dependent on the end result. Simple training can be done on normal CPUs while multi-layered testing would require GPUs and even FPGAs.
Most modern programs run on an NVIDIA GPU or an Amazon Web Services C2 GPU instance. Google too is making an entryway into the market with the Google Cloud Platform which looks alluring initially due to its zero costs. It may become more costly as the projects grow more complex though. But there are some minimum requirements for the setup to ensure a smooth simulation run with no crashes.
Experts suggest having at least the Intel Core i5 6th Generation processor or higher. Having an AMD equivalent processor works just as well. Keras will definitely make your PC’s RAM its entire home. So, boot up at least 8 GB to 16 GB.
There are many options when it comes to choosing GPUs. Start with the simpler NVIDIA GeForce GTX 960 or higher. Be wary about using AMD GPUs as they aren’t the default choice for performing deep learning exercises. And if you ever run into trouble with configuring the GPU with the system, rebooting manually isn’t everyone’s cup of tea. GPUs are nevertheless great for parallel programming and can be used to analyze datasets other than text and numeric types.
What about operating systems? Windows, being the ubiquitous choice, is always the first choice regardless of version. But across your journeys using keras, you’ll need to confront the need for greater CPU strengths which can be achieved by linking multiple PCs together. Ubuntu and Linux OS work well in configuring cycle speeds for singular procedures. If you’re got a laptop that runs on similar operating systems, getting some additional RAM would power up the simulations faster. It would be ideal to use technologies such as Alienware, ASUS, Acer Predator or Lenovo Region.
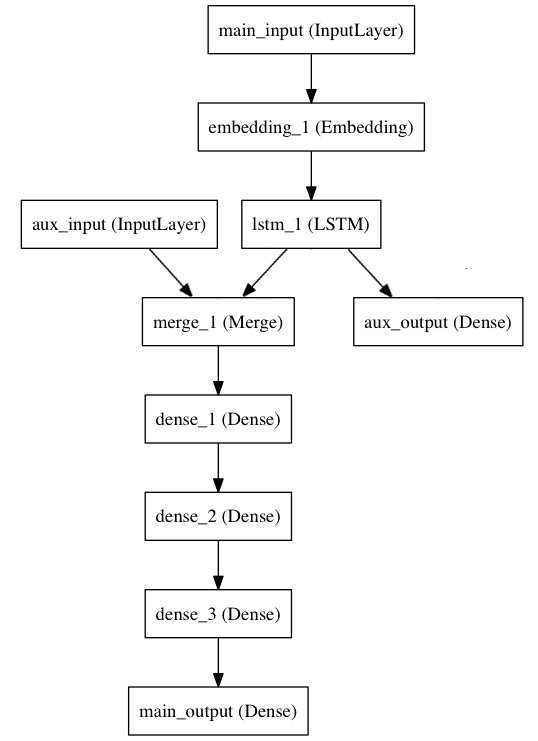
Keras Functional API LSTM Model
You might be swayed initially to invest in a GPU given its ability to clock speeds 2 to 3 times faster than a CPU, but its best to wait out and check for appropriate prices. There are alternatives to the GPUs such as FPGAs and ASIC.
Another great trick is to use the CUDA driver that was created by Nvidia for graphic processing in high level languages. Versions like the i7–7500U can train an average of 120 calculations/second.
Checklist for best practices
1. Start low and start good. Use conventional types like the Nvidia GTX 1080 (8 GB VRAM) that can bring about 14000 computations per second. Remember that the GPU and CPU have to go together and must work simultaneously for the best results. Using an i7-7500U will work flawlessly with a GTX 1080 GPU for example.
2. Furthermore, GPUs can perform convolutional/CNN or recurrent neural networks/RNN based operations much faster which may warrant their use against TPUs. It all goes down to what the operation demands and what can be done to optimize the systems better. It can also perform operations on a batch of images of 128 or 256 images at once in just a few milliseconds. However, the power consumption can double once more data is brought in.
3. Always check for three main metrics when looking for GPUs- memory bandwidth(how much data the GPU can handle), processing power(how quickly the GPU can compress data for each clock speed) and video RAM size (the amount of data on the video card at any point of time).
4. Using multiple video cards is a great boost for high level operations but should be restricted to 16 PCIe lanes available for data transfer. Processors for single desktops usually use 16 lanes. Anything that takes 32 lanes is not fit for CPUs. For 3 or 4 GPUs, use 8x the lanes per card.
5. Just to avoid any start up issues use the CUDA drivers, which are discussed in the next chapter. Built by Nvidia, the CUDA toolkit is well congruent with multiple platforms including Pytorch, sklearn, Tensorflow and keras.
6. Intel recommends changing the parallelism threads and the OpenMP settings by changing the configuration files:-
config = tf.ConfigProto(intra_op_parallelism_threads=NUM_PARALLEL_EXEC_UNITS, inter_op_parallelism_threads=2, allow_soft_placement=True, device_count = {'CPU': NUM_PARALLEL_EXEC_UNITS })
session = tf.Session(config=config)
K.set_session(session)
os.environ["OMP_NUM_THREADS"]="NUM_PARALLEL_EXEC_UNITS" os.environ["KMP_BLOCKTIME"] = "30"
os.environ["KMP_SETTINGS"]="1"os.environ["KMP_AFFINITY"]="granularity=fine,verbose,compact,1,0"
7. Running the keras functional API on a sample on the entire dataset before applying the model to the entire data is a good method to avoid crashes and hang ups.
8. Keep secondary cross validation procedures vacant while the main processes run to reduce pressures on the hardware. Maintain a hardware capacity, whether a CPU or GPU, below 85%. Larger PCs can cross over 90% but for beginners use smaller predetermined limits.
Installing cuda drivers
C:\cudnn-9.0-windows10-x64-v7,C:\cudnn-9.0-windows10-x64-v7\cuda\bin
conda create -n tensorflow pip python=3.6, activate tensorflow
pip install tensorflow-gpu==1.8.0, sudo cp lib64/* /usr/local/cuda/lib64/
sudo cp include/cudnn.h /usr/local/cuda/include/,
export LD_LIBRARY_PATH=/usr/local/cuda/lib64:${LD_LIBRARY_PATH}
export PATH=/usr/local/cuda/lib64:${PATH}
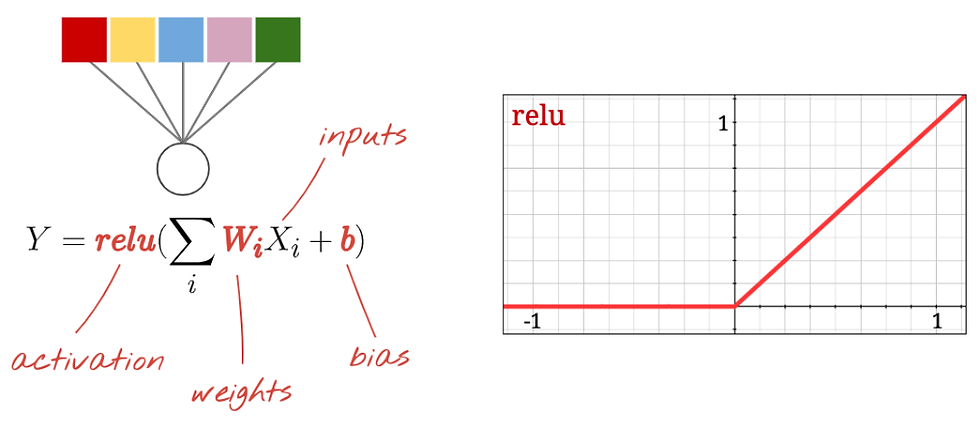
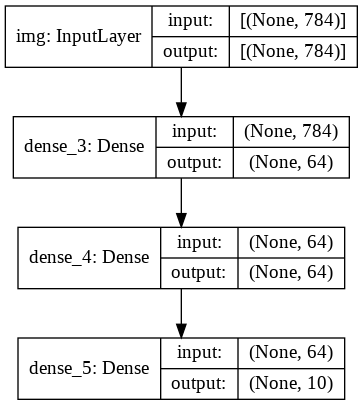
RELU Model for Keras
The CUDA drivers can also be used to perform Kernel optimization using an iterative loop. This is done by first creating an inner loop that has a scalable RPC runtime framework and a tensor compiler. The tuner picks a batch of kernel implementations that have promising candidates and then impose them on a real hardware. The turner then extracts the profiling results and are later used as training data to fit the prediction model. After fitting the prediction model, the tuner proceeds to pick the next best candidates according to the predictions, and the loop continues. Searching for the best kernels thus becomes faster.
cudaEvent_t start, stop; float time;
cudaEventCreate(&start);
cudaEventCreate(&stop);
cudaEventRecord( start, 0 );
kernel<<<grid,threads>>> ( d_odata, d_idata, size_x, size_y, NUM_REPS);
cudaEventRecord( stop, 0 );
cudaEventSynchronize( stop );
cudaEventElapsedTime( &time, start, stop );
cudaEventDestroy( start );cudaEventDestroy( stop );
The above code should be implemented whenever new events have to be removed and created in the CUDA mainframe.
size=N*sizeof(float)/nStreams;
for (i=0; i<nStreams; i++) {
offset = i*N/nStreams; cudaMemcpyAsync(a_d+offset, a_h+offset, size, dir, stream[i]); kernel<<<N/(nThreads*nStreams), nThreads, 0,
stream[i]>>>(a_d+offset);}
A look at other hardwares
Experts weigh in that the best libraries for performing deep learning on keras are available on NVIDIA which have overshadowed AMD’s OpenCL and other alternatives. The difference in the years of release also means that you’re likely to find better solutions for hardware issues for NVIDIA.
Next up in the list comes AMD. The company slated a format to convert the code into the respective GPU language before being compiled to the GPU assembly. Early users will however find the challenges with importing TensorFlow and PyTorch code bases from the mainframe. Deep learning support for keras and TensorFlow exists for AMD’s hardware but it is dogged with large coding and confusing syntaxes.
Performance wise, AMD GPUs now have 16-bit compute capability but still fail to match to the Tensor Cores of NVIDIA GPUs which work fantastically for transformers and convolutional networks.
And then comes Intel. The Xeon Phi has often bee hailed to be the company’s best hardware for deep learning projects but might not match to the likes of NVIDIA or AMD cards. Newer patches and code compatibilities with support for C++11 features is however making it a great choice for early programmers.
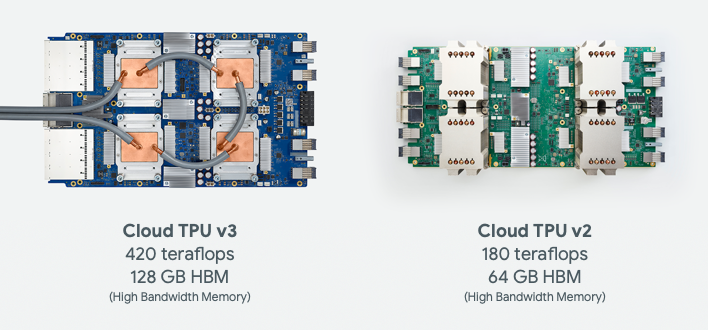
Intel also has the Nervana neural network processor (NNP) which is set to release this year and might be a powerful contender to NVIDIA and AMD. Google too isn’t lagging behind in the hardware department. The company’s TPU mainframe supports a solid and cost-efficient parallelization infrastructure. The TPUs also add an extra firepower to the processing speeds by adding cloud support over 4 GPUs. PyTorch too has become functional with the keras functional API with a strengthened on the TPU mainframe.
That doesn’t mean that the mainframe hasn’t had any issues. The LSTM convergence for the hardware is still a challenge to address. Be warned though, training large TPU models tends to bring up the cumulative costs, even though they promise great amounts of power. It’s best to use non cloud variants when simply testing and prototyping the model datasets.
Keras With The Cloud
The AWS and Azure are great variants for performing high level deep learning projects using external spacing power. So to summarize- transformer models and media detection algorithms can use cloud GPUs but anything else should be done using physical GPUs. One can even choose to switch simultaneously between the GPUs and TPUs at any time or even use both at the same time.
Keras API for TPU with Cloud Mainframe
Comments